
There's no denying that a great fake tan can be a total godsend. Not only can it do wonders for your confidence, but it's the perfect way to get that sun-kissed, summertime glow any time of the year, without having to worry about heat or harmful UV rays.
That being said, diving into the world of self-tanners can be a little nerve-racking. After all, no one wants to end up looking like an unnatural, orange mess. Been there, done that, NO thank you! Not to mention, so many self-tanning products all promise the same thing, making the hunt for the best fake tanner that much tougher!

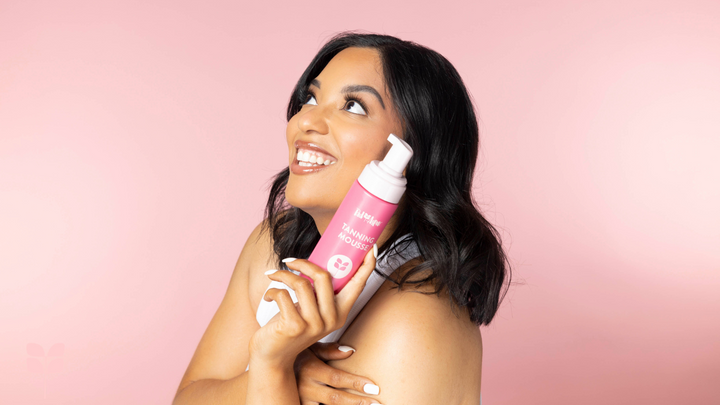
At-home tanning products have come a long way over the years, and luckily, there's easy solutions for a streak-free fake tan you can fall in love with. In this blog, we'll go over everything you need to know about Red Aspen Tanning Mousse , with step-by-step instructions to help you apply the perfect fake tan every time.
Reasons to Love Red Aspen Tanning Mousse

Ask anyone new to self-tanning, and their first question is usually something along the lines of "Do self-tanners really work?" The answer to that is a resounding "Yes!,” though it's OK if you need a little more convincing. Let's go over a few of the benefits you can expect when you break open your bottle of Tanning Mousse from Red Aspen!
Quick-drying Coverage from the Comfort of Your Own Home

When you're hunting for the perfect sunless tanner, you're no doubt looking for something that will dry quickly. This goes double during the warmer months, as trying to lay in bed wearing a sticky, thick coat of self-tanner is beyond foul. A girl should be able to self-tan comfortably while she sleeps!
With Red Aspen self-tanning mousse, you get a fully-developed, illuminating, high-intensity tan within 4-8 hours. Best of all, you get a light, quick-drying formula that applies easily, free of that icky, sticky feeling.
An Effortless and Natural-looking Glow
Whether you have fair skin or a darker complexion, you deserve a sunless tanner that looks as natural as the real thing. Not only that, but you deserve a product that glides on smoothly and evenly.


As a beauty industry leader with years of experience developing high-quality skincare and cosmetics solutions, Red Aspen's tanning mousse formula is made with 100% natural, plant-based tanning, active ingredients. Rose essential oil works to deeply nourish your skin, leaving it feeling lightly kissed with a floral scent. At the same time, rich Vitamin E helps to even the appearance of your skin tone, hydrating your skin and blurring imperfections. The end result is a radiant, golden glow you'll be eager to brag about to your besties.
The Streak-free Tan You've Been Searching For

Every gal can appreciate an effortless, "no makeup" makeup look. After all, nothing boosts your confidence more than a flawless complexion, especially one you can wake up to! That being said, you don't have to chase that perfect golden glow by baking in the sun for hours at a time. The potential sun damage just isn't worth the trade-off!
By investing in Red Aspen Tanning Mousse, you can achieve illuminating, lasting results without the fear of looking like a patchwork quilt! Our tanning mousse formula includes an added caramel color guide to help you better see where you've applied the product. This unique feature helps ensure even, streak-free coverage when applied with our Tanning Mitts and Kabuki Brush.
How to Apply Red Aspen Tanning Mousse the Right Way
Applying self-tanner is somewhat of an art form, and there's definitely a right way to do things if you want the best results. But, like anything, with proper direction and plenty of practice, self-tanning is easy to master. To achieve your best-ever fake tan, here's how to apply your new bottle of Red Aspen Tanning Mousse.
Step 1. Exfoliate Your Skin and Remove Unwanted Hair

One of the classic fears of sunless tanning is a patchy, streaky mess. Fail to do the proper prep work, and you may end up with an embarrassing "Oops" of a tan. Therefore, like most self-tanners, the first step towards applying a great fake tan is to exfoliate your skin and remove any unwanted hair. Take the time to jump into a soothing shower and thoroughly wash and completely dry your skin. An exfoliating mitt is ideal here, as the microfiber can help gently buff away dry skin and prep your body for the tanning mousse later.
Likewise, aim to start the exfoliation process at least six hours before you apply your self-tanner. This means you'll also want to do all your pre-tanning shaving a few hours beforehand as well. Both of these steps are extremely important, as you want to create a nice, smooth base for your self-tanner to glide onto. Fail to do so, and you risk your tanner sticking or clinging to dead skin cells. More importantly, you want to give those little hair follicles on your legs a chance to close, as trying to apply self-tanner too soon after you've shaved can lead to some annoying irritation.
Step 2. Moisturize Common Dry Spots on Your Skin
The next step to applying your tanning mousse is to properly moisturize those common dry spots on your skin. Pick your favorite moisturizer, hand cream, or body cream, and apply it carefully to your elbows, knees, ankles, feet, and hands.


Remember, you don't need to over-moisturize your whole body, as you could dilute the color. Instead, stick to moisturizing these typically dry areas as they tend to soak up extra product, and the moisturizer acts as a barrier. In other words, this is your protection against orange palms or feet.
Pro Tip: Be sure to apply your moisturizer every day in the week leading up to applying your new self-tanner. This will ensure properly hydrated skin and therefore an even coverage of your self-tanner.
Step 3. Give Your Self-Tanner Bottle a Shake
Now that it's time to officially start applying your self-tanner, you'll want to give the bottle a proper shake. This helps ensure the product is evenly mixed. Remember, don't skip a single step here! You want the best fake tan you can get, and every step matters towards achieving those results.
Step 4. Break Out the Self-tanning Mitt and Brush

For the most flawless application of your tanning mousse, it's best to break out your trusty tanning mitt. Thanks to its soft, velvety texture, this will help the product to go on smoothly and streak-free, simultaneously protecting your fingers from unwanted stains.
Stand in front of a mirror and one to two pumps of Tanning Mousse into the Tanning Mitt. Use circular motions to apply the product to clean, exfoliated skin. Thanks to Red Aspen's advanced color guide within the formula, you should be able to easily tell which spots have and haven't already been covered.
For blending those tricky, extra-absorbent areas like the face, ears, hands, and feet, a kabuki brush can be your best friend! Similar to your favorite makeup brush, it's made with a short handle for easy control and bristles that are short and tightly packed together. The result is a pocket-sized brush you can use to apply your self-tanner perfectly.

Step 5. Give Extra Care to your Elbows, Knees, and Wrists

Even if this isn't your first fake tanning rodeo, try and remember to give your elbows, knees, and wrists a little extra care during the process. Your elbows and knees are especially likely to be drier or more knobby, so the kabuki brush will work wonders to get into those nooks and crannies to ensure even application of the tanning mousse. Just be sure to use circular motions similar to the tanning mitt, and only use a small amount of the tanning mousse.
Tips for Applying Self-tanner to Your Face

Just like with the rest of your body, applying self-tanner to your face requires a bit of extra care. While you have the option to use the kabuki brush here as well, you can also opt to use a special tanning mini mitt.
Made with the same velvety smooth materials as a standard tanning mitt, it's a great way to ensure a streak-free tan on your monkey maker every single time!
Tips for Applying Self-tanner to Your Back

Anyone who's ever gotten a fake tan knows the struggle of getting things right on the back. After all, it's one of the more tricky spots to reach. Thankfully, there are tools like Red Aspen's Tanning Back Applicator to make the process a lot less awkward. With easy-grip handles and gentle fabric that wraps around comfortably for even coverage, you'll never have to worry about embarrassing tan lines again!
Pro Tip: After you've applied your tanning mousse, be sure to wear loose clothing and avoid sweating, exercising, or getting your skin wet for at least a few hours.
Step 6. Finish Off Your Fake Tan by Moisturizing Your Skin

Once you're finished applying your tanning mousse and feel great about the coverage, it's time to start thinking about how you can maintain your look for as long as possible. After your tan develops, and you wash it off with a nice shower, you'll want to finish off your fake tan by applying a nourishing moisturizer to your skin. Not only is moisturizing an important part of overall skin health, but it'll prevent your tan from cracking or peeling as well.
Infused with shea butter, sunflower seed oil, and pomegranate, Red Aspen Hand Cream is a luxurious, fragrance-free formula that will work to refresh, replenish, and nourish your skin with each use. Not only will you enjoy a richer, more luminous tan, but you’ll also enjoy long-lasting, portable, fragrance-free hydration that will leave your skin feeling happy, healthy, and silky smooth. Alternatively, you might opt for the scented, subtle shimmer formula of Red Aspen Body Cream. Whatever your preference, you'll have the perfect complement to your tan and a fitting barrier cream.
Apply Red Aspen Tanning Mousse to Your Beauty and Skincare Routine
Self-tanning can be a truly wonderful exercise in self-care, especially if you didn't quite meet your quota for time spent at the beach, the lake, or the pool this year. That being said, it's not always easy to know which fake tanning products are the best, least of all when you're a newbie to the whole thing!
At Red Aspen, we believe in creating innovative products for the everyday woman, and our tanning mousse can offer you the high-intensity, head-to-toe glow you've been searching for. We believe in ingredient transparency because informed beauty choices start with the ingredient list. Whether you're a seasoned pro at self-tanning or you're excited to add something new to your beauty regimen, you owe it to yourself to see what Red Aspen Tanning Mousse can do for your complexion and your confidence. Reach out to your Red Aspen Brand Ambassador today to learn how you can Red Aspen Tanning Mousse to your beauty and skincare routine today!
Written by: Red Aspen
Done reading? Return to home.