Whether you’re super new to makeup or you consider yourself a bonafide beauty artist, every girl knows that long, defined lashes make a world of difference for your overall look, framing your face and opening up your eyes to create a refreshed, brighter appearance that captivates with very little effort. Every gaze or blink is accentuated, and there’s an undeniable thrill in knowing your lash game is the stuff of envy.
From classic lash styles that accentuate your eyes’ natural appearance to bold, dramatic lashes that add that perfect touch of drama, there are so many options to choose from, especially if you’re looking to try your hand at this year’s hottest lash trends.
That said, even the most dramatic lash looks require some prep work. You need the right tools, and if you hope to replicate your results down the road, you need a proper starting point. In this blog, we’re diving into everything you need to know for achieving your best-ever lash looks. Along the way, we’ll highlight everything we love about Red Aspen lash tools, with tips and tricks you can use to ensure flawless results every time. Let’s get started!

Why the Right Lash Care Tools Are Important
You likely already know this, but lash care is extremely important. A solid lash care routine is key to promoting healthy and strong eyelashes, and this care goes beyond moisturizing and conditioning your face with premium oils, serums, and other beauty products.
Whether you’re curling your lashes to perfection, adding some much-needed lift, or just combing through them to de-clump your mascara, you want to know that the tools you’re using are high-quality and fit for the task. In other words, you want to be choosy with your lash accessories, the same as you’d be with any brush you use to apply your everyday foundation, blush, or eyeshadow!
What’s Included in the Red Aspen Lash Tools Collection?
As a leading beauty and cosmetics company with years of experience creating high-quality makeup products for everyday women, our team at Red Aspen knew we needed to provide our customers with everything they’d need to achieve their dream lash looks in a fraction of the time. To that end, we created the ultimate Lash Care Collection. Here’s what that collection looks like at a glance:
Red Aspen Lash Curler
As a longstanding icon of the beauty industry and one of the most important makeup tools a woman can own, lash curlers have been helping women lift, curl, and accentuate their eyelashes since the 1930s. A great lash curler is an absolute godsend, and when you want to give your lashes noticeable lift, volume, and definition, and have that effort stay in place throughout the day, the right lash curler makes all the difference.
With its comfortable, ergonomic handle and beautiful rose gold finish, Red Aspen’s Lash Curler is designed to help you add flawless, long-lasting curl to your fluttery lashes for any occasion. Not only is it easy to use, but it fits snugly in your purse or makeup bag, making it the perfect addition to your lash care routine. Best of all, you can pair it with your favorite Red Aspen mascara for a variety of bold and beautiful lash looks!

Red Aspen Lash Comb
As another must-have makeup tool, a lash comb is often the perfect solution to unruly eyelashes. Absolutely no one enjoys moments where your mascara seems to clump against all odds, and it can be a real pain trying to use your fingers or the mascara wand to fix things on the fly.
Designed to comb through each lash hair to separate them, a lash comb can often be your saving grace, resulting in lashes that look more natural and evenly-spaced by the time you’ve finished combing through them. Likewise, if you love your mascara but sometimes leave a little too much behind, a lash comb can work to pull out excess product, resulting in a more comfortable, clump-free experience. With a compact design that folds and fits neatly in your purse or makeup bag, Red Aspen’s Lash Comb offers all of the above benefits, making it the ideal tool for wispy, effortlessly beautiful lashes in a flash!

Shear Perfection Lash & Brow Mini Scissors
It’s no secret that eyebrow maintenance can be intimidating, time-consuming, and annoying (if we’re being honest). That said, it’s also downright necessary. After all, you don’t want your brows to be uneven – or worse, overplucked – and if you want to achieve a polished look, you gotta bite the bullet, plain and simple.
Thankfully, there are tools you can use to trim and taper your facial hair in a flash. With Red Aspen’s Shear Perfection Lash & Brow Mini Scissors, you can shape, snip, and style your best-ever brows in a fraction of the time, giving you more time to concentrate on other priorities in your beauty routine!
If you’re the type of girl who fancies a pair of false lashes every now and then, you’ve also got the perfect tool to trim those lash bands, as the stainless steel blades and compact design help to ensure everything is neatly tailored to your face shape.

Lash Applicator
Speaking of false eyelashes, there’s a definitive right way and wrong way to apply them. It’s a bit of a learning curve, but once you learn all the tricks, you'll be surprised at how quickly you turn pro.
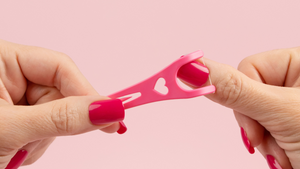
That said, you’ll want to first get your hands on a Lash Applicator, as it has a very specific and very beneficial purpose. Designed to help you precisely apply your favorite falsies right to your lash line, its unique shape means you’ll never have to worry about imperfect placement, no matter your experience level! Plus, with correct placement being the key to long-lasting wear, you can never be too careful.

Lash Glue
Any girl who's ever applied false lashes knows how confusing the process can be the first time around. There’s different ways to apply the required adhesive, and both methods have their pros and cons. Those who opt for traditional lash glue love the all-day hold, and for women looking to try heavier lashes/heavier bands, a lash glue is usually going to be the best bet. That said, you do have to be a bit more careful during application to avoid running or dripping.
With Red Aspen lash glue, you have a long-lasting, latex-free adhesive that will keep your lashes in place throughout the day. Not only is it iridescent during application, but it dries clear in seconds, meaning it won't ruin your flawless eye makeup. Best of all, the brush applicator allows you precise control of the amount of adhesive you apply to your lash, making application of your favorite falsies easier than ever before!

Lucy’s Lash Pen
For women who prefer a different approach to lash adhesive, there’s something to be said about the wonders of adhesive eyeliner. It’s easy to apply, quick-drying, and you don’t have to worry about the running or dripping usually associated with lash glue.
Thanks to Red Aspen’s Lucy’s Lash Pen Adhesive Eyeliner (available in Black, Brown, or Clear), you have all the benefits of adhesive eyeliner in the form of a handy little lash pen that fits neatly into your purse or pocket! True to its name, it goes on just as quickly as your favorite eyeliner, meaning you never have to worry about the adhesive running or dripping. Better still, adhesive eyeliner looks amazing with natural/invisible band lashes, making it the perfect 2-in-1 product to keep your falsies in place without the fuss.

How to Use Red Aspen Lash Tools to Achieve Flawless Brows and Lashes
Creating and maintaining your dream lash looks is a process that might seem confusing at first, but it gets easier over time. No one’s a beauty expert from the beginning, and that’s okay!
That said, there are some steps you can take to ensure you achieve flawless results for your lashes every time. From combing and curling your lashes to keeping your facial hair tidy and trimmed, here are the key steps you need to know when using Red Aspen lash tools.
How to Use a Lash Comb and Lash Curler Without Damaging Your Lashes
Step 1. Gently Glide the Lash Comb Through Your Lashes
The first step towards great lashes is becoming familiar with your lash comb. As we highlighted above, this awesome little beauty tool is designed to separate each lash, preventing your mascara from clumping and making your lashes appear ultra defined. This is especially important if you’re going for a look that’s more subtle, but it’s also great when you want to achieve something more voluminous minus the heavy, spidery effect that some mascaras can create.
Therefore, you want to make a habit of gently gliding the eyelash comb through your lashes before you do anything with your mascara. The idea is to prep your lashes to avoid clumping, and you’ll do this again later. Keep that in mind.
Step 2. Curl Your Lashes Before Applying Mascara
Now, women have often wondered if they should use an eyelash curler before or after applying mascara, as the urge to save time is a tough one to shake. That said, there’s a definitive order to these things, and messing with that order can result in some major oopsies, causing damage to your lashes in the process. Big yikes!
Always, always curl your lashes before applying mascara, as doing the opposite can lead to a dirty lash curler that actually makes your mascara flake or dry very stiff. No, thank you!

Step 3. Curl Your Lashes Upward for the Best Results
Using an eyelash curler for the first time can be tricky, but it doesn’t have to be complicated. As you use your lash curler, make sure to gently clamp the curved, padded part over your natural lashes, gradually working the curler upward. Use light to medium pressure so you don’t overdo it.
If done correctly, you’ll notice instant curl and lift to your lashes. You’ll also notice your eyelashes stay curled for longer, and that’s the biggest win of all!
Step 4. Gently Squeeze and Hold the Lash Curler on Your Lashes
When using your lash curler, remember to always squeeze the curler shut gently and hold for a few seconds before releasing. The lashes should fall between the two clamps easily, and if you feel a pinch, you can move the curler away from you to reposition and try again.
Remember, the goal is to get as close to your lash line as you can without accidentally nipping into your skin. Again, light to medium pressure is best. Repeat this process on the opposite eye, and voila! Flawless, fluttery lashes!
Step 5. Apply Your Favorite Red Aspen Mascara
This next step is easiest: just apply your favorite Red Aspen mascara! Whether you prefer black mascara, brown mascara, or something waterproof, you should notice that your mascara applies much more evenly now that you’ve prepped them using the lash comb.
Not only that, but you’ll smile at the sight of how consistent everything looks in the mirror. Memorize how you feel at this moment! You’re building a better beauty routine already!

Step 6. Comb Through Your Lashes a Second Time
Now that you have your mascara in place, it’s time to comb through your lashes a second time with the lash comb.
Even if you think everything looks great on the first go-around, you want to do this before your mascara dries completely. The goal is to prevent accidental pulling or tugging on the natural lash as you comb through. Additionally, this will help to remove any excess product if you got a little too excited with the application.

Step 7. Always Clean Your Lash Comb and Lash Curler After Every Use
Just like your favorite makeup brushes, your eyelash curler and lash comb need to be cleaned on a regular basis. Your lash line is going to be prone to styes, and your eyes themselves are pretty vulnerable to all sorts of icky and annoying infections.
In the same way you clean your face and remove your makeup before bed, try and make a habit of cleaning your lash tools. It’s a super easy process, and for the lash curler, all you need to do is remove the silicone pad and scrub with soap and water. Do the same with the handle, then rinse and pat dry with a clean towel.
Cleaning your Red Aspen Lash Comb is just as easy. Simply soak the comb in soapy, warm water for a few minutes before using a soft brush to scrub off any excess dirt or makeup. Rinse the comb with water and dry with a clean towel.
How to Use Red Aspen Shear Perfection Lash & Brow Mini Scissors
Step 1. Use Red Aspen Eyelash Scissors to Enhance Your Beauty Routine
If you’ve never owned a pair of eyelash scissors before, you’re going to grow to love them very, very quickly. Remember what we mentioned above about lash and brow maintenance? It doesn’t have to be complicated.
By adding beauty scissors to your routine, you save time (and headaches) later, as you’ll already be in the habit of keeping your brows and false lashes trimmed with the right tool.
Step 2. Safely Trim Your False Lashes, Eyebrows, and Facial Hair
Trimming Your Eyebrows
No matter what you’re trimming, you want to do so safely and carefully. When trimming your eyebrows, you’ll get the best results by using a brow brush with a spoolie for a more precise lift. Start by placing your brow brush parallel to the brow with your lash scissors facing upwards in an open position. This will help you better see which section of your brows need trimming.
From there, you’ll want to carefully snip this section of hairs to your desired shape. Repeat the process in small sections. Again, don’t be afraid to comb through the brows if you need the extra guide. Your goal is a clean look, and it’s okay to take some extra time for the sake of better results. Likewise, remember that you can apply this same process to any unruly facial hair that also needs trimming. Since the lash scissors are small, you’ll have just the right tool for those precision areas.
Trimming Your False Lashes
If you’re trimming a pair of false lashes, there are three things to remember: you want to measure the lash band for accuracy, you want to hold your lashes in place with a lash applicator tool while doing so, and you want to take things slowly.
Once you’re ready to begin, take your lash scissors and carefully trim the outer corner of the band based on your previous measurements. You only want to trim from the outer corner of the band, and you only want to trim a little at a time to avoid overdoing it.
Likewise, you should never, ever attempt to trim your false lashes while wearing them. Not only will this risk damage to the lash, but it risks damage to your eyes as well. Trust us, it’s not worth it! We have a more detailed guide on trimming your false lashes as well, so don’t forget to check it out! You’ll also find tips on finding the right false lashes for your eye shape.
Step 3. Always Clean Your Red Aspen Eyelash Scissors After Using Them
Just as with your other beauty tools, cleaning your eyelash scissors regularly is an important part of any beauty routine.
Thankfully, there’s not much to it, and for the best results, you can use barbicide, rubbing alcohol, or mild soapy water to ensure your lash mini scissors remain sanitized and free from dirt, bacteria, and grime.
The Benefits of Red Aspen Lash Tools vs. Competitors
Whether applying Red Aspen at home or on-the-go, our products are guaranteed to be fun, playful, and intuitive. Beauty starts from within, and every Red Aspen product is grounded in our core values and mission - to uplift, empower, and enhance the beauty of all women.
As we continue to create new lash products and tools, we wanted to highlight some of the key benefits of our products versus our competitors. Here are some not-so-subtle reasons Red Aspen lash tools are worth a second look.

Red Aspen Lash Tools are Easy to Use
The primary benefit to Red Aspen lash tools versus competitors is how easy they are to add to your existing beauty routine.
As a leading beauty and cosmetics company, we’re constantly looking for new ways to create products that everyday women can use and understand comfortably, regardless of their experience level. We feel we’ve done a great job with that, and we’ll continue that well into the future. We value your feedback, and we promise to never stop learning!
Price Point
Another area where Red Aspen excels is price point. Like our iconic collections of press-on nails, makeup, and skincare products, we strive to ensure our lash products and lash tools are competitively priced.
At the end of the day, we believe in creating innovative products for the everyday woman, and we understand the importance of beauty products that are both high quality and affordable. After all, you should never have to sacrifice one for the other.
Deliberately Designed
Another win for Red Aspen is how deliberately our products are designed, both for efficiency as well as versatility. For example, unlike other lash curlers on the market, Red Aspen’s Lash Curler is designed with a lower profile curve, making it suitable for all eye shapes and sizes, rather than a select few.
In the same vein, our Lash Comb was created to be small and compact, rather than the bulky, bit-too-large lash combs typically offered by competitors. On top of that, you get the benefit of a foldable design, making it much easier to take with you on the go! A win-win all around!
Build a Better Lash Care Routine with Red Aspen

So, there you have it! Everything you need to know about achieving your best-ever lashes with Red Aspen Lash tools. Whether you’re super new to all of this information or you just wanted a refresher, we hope this guide helped you feel better about taking your beauty routine to the next level.
Likewise, if you found yourself curious to learn more or just want to see what else Red Aspen has to offer, we’d love to hear from you! Reach out to a Red Aspen Brand Ambassador today to learn how you can build a better lash care routine with Red Aspen!
Written by: Nathan Jones
Done reading? Return to home.

